While not as critical as it used to be, checking under the hood periodically can head off problems before they become costly.
First: Safety ---- Read the safety warnings in your owners manual and any safety warning stickers that may be under the hood. If the engine has been running for any length of time, there are areas under the hood that can be very hot. Except for checking transmission fluid level, all checks should be done while the engine is turned off.
The following items should be checked periodically:
- Engine oil level
- Transmission fluid
- Brake fluid
- Power steering fluid
- Coolant (Antifreeze) level
- Battery
- Windshield washer solvent
- Belts & Hoses
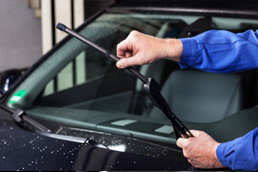
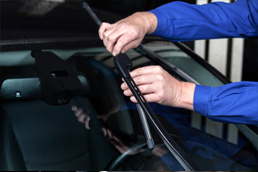
- Windshield wiper blades
This is the most important under-hood check you can do. An engine cannot run without oil even for a minute without serious engine damage or total destruction! To check the oil level, make sure that the engine is turned off, then find the engine oil dipstick and remove it. With a paper towel or rag, wipe off the end of the stick and notice the markings on it. You will usually see a mark for "Full" and another mark for "Add." Check your owners manual to be sure. Push the stick back into the tube until it seats then immediately pull it out to see the oil level. You should not add oil unless the level is below the "Add" mark and NEVER add oil to bring the level above the "Full" mark.
Transmission fluid
Most automatic transmissions should be checked while the engine is running. Check your owners manual to be sure. Also make sure the car is on a level surface and fully warmed up. Pull the transmission dipstick out, wipe off the end and note the markings on the end of the stick. The usual markings are "Full" and "Add 1 pint." Push the stick into the tube until it seats, then immediately pull it out to see the fluid level. Transmission fluid should be pink or red in color with the look and consistency of cherry cough syrup. If the fluid is a muddy brown or has a burnt smell, have it checked by a mechanic. As with the engine, never add fluid unless it is below the "Add" mark and never bring it above the "Full" mark. Make sure you use the correct transmission fluid for your vehicle. If you plan to add Transmission fluid yourself, you should know that fluid usually comes in quarts, but the level may not be low enough to take the full quart. Also, you will need a special funnel to get the fluid into the small tube that the dipstick came out of
Brake fluid
The brake fluid reservoir is under the hood right in front of the steering wheel. Most cars today have a transparent reservoir so that you can see the level without opening the cover. The brake fluid level will drop slightly as the brake pads wear out. This is a normal condition and you shouldn't worry about it. If the level drops noticeably over a short period of time or goes down to about two thirds full, have your brakes checked as soon as possible. NEVER PUT ANYTHING BUT APPROVED BRAKE FLUID IN YOUR BRAKES. ANYTHING ELSE CAN CAUSE SUDDEN BRAKE FAILURE! Keep the reservoir covered except for the amount of time you need to fill it and never leave a can of brake fluid uncovered. Brake fluid must maintain a very high boiling point .Exposure to air will cause the fluid to absorb moisture which will lower that boiling point.
Power steering fluid
The power steering fluid reservoir usually has a small dipstick attached to the cap. Remove the cap and check the fluid level. The level should not change more than the normal range on the stick. If you have to add fluid more than once or twice a year, then have the system checked for leaks. These systems are easily damaged if you drive while the fluid is very low. Another warning of low power steering fluid is a buzzing noise when you turn the steering wheel at slow speeds.
Coolant (Antifreeze) level
Never open the radiator of a car that has just been running. The cooling system of a car is under high pressure with fluid that is usually hotter than boiling water. Look for the cooling system reserve tank, somewhere near the radiator. It is usually translucent white so you can see the fluid level without opening it. (Do not confuse it with the windshield washer tank). The reserve tank will have two marks on the side of it. "FULL HOT" and "FULL COLD." If the level frequently goes below "full cold" after adding fluid, you probably have a leak which should be checked as soon as possible. Today's engines are much more susceptible to damage from overheating, so do not neglect this important system.
Battery
Most batteries today are "maintenance free" which simply means that you can't check the water level. This doesn't mean however, that there is nothing to check. The main things to check are the top of the battery which should be clean and dry, and the terminal connections which should be clean and tight. If the top of the battery continuously becomes damp or corroded soon after cleaning, then have the charging system and battery checked by your mechanic.
Windshield washer solvent
Windshield washer solvent is readily available by the gallon in auto supply stores as well as supermarkets and it is cheap. It is fine to use with or without adding water but will clean better undiluted. Never dilute it during winter months to insure that it retains its antifreeze protection.
Belts & Hoses
In most cases your mechanic can check your belts and hoses when you bring in the car for an oil change. However, if you get your oil changed by some quick lube type centers, belts and hoses may not be on their list of items to check in which case you're on your own. These checks are best done while the car is cold.
Belts are used to drive a number of components on an engine including: the water pump, power steering pump, air conditioner, alternator and an emission control pump. Some later model cars have a single "serpentine" belt that handles everything. This type of belt looks flat on one side with several ribs on the other side. You should check the ribbed side for signs of dry and cracked rubber. Serpentine belts are usually self adjusting and very durable. They should last about 30,000 miles. The other type of belt is called a "V" belt and is adjustable. There is usually more than one to an engine, sometimes three or four. Check each one for cracks and tightness and have them replaced if you find any problems. Some V belts are hard to reach but no less important so if you can't reach it to check then have your mechanic do it periodically.
Hoses should be checked visually and by feel. You are looking for dry cracked rubber, especially at the ends where they are attached. You should also check the ends for any signs of ballooning.
Source